Roles
The Roles interface allows administrators to manage user roles, define permissions, and control access levels within the LinQ Explorer system.
Accessing the Roles Interface
To access the Roles management interface:
- Navigate to App Management from the main navigation
- Click on Roles from the App Management menu
- The Roles interface will display all available roles in the system
Roles Interface Overview
The Roles interface provides a comprehensive view of all roles defined in the system. Roles determine what actions users can perform and what resources they can access within LinQ Explorer.

Header Section
The header section of the Roles interface contains three main elements:
- Page Title: "User Roles" displayed prominently at the top-left of the page
- Search Bar: Located in the top-right area, allows you to search for roles by typing keywords in the "Type here" field
- Add Role Button: A dark blue button with a shield icon and "Add Role" text, positioned next to the search bar
Searching for Roles

To search for specific roles:
- Click in the search input field in the header
- Type any part of the role name or description
- The table will automatically filter to show matching roles as you type
- Clear the search field to view all roles again
The search functionality filters the roles table in real-time as you type, making it easy to find specific roles in large role lists. For example, typing "test" in the search field will display only roles whose name or description contains "test". The filtered results are displayed immediately, showing both Active and Inactive roles that match your search criteria.
Adding a New Role
To add a new role to the system:
- Click the "Add Role" button in the header
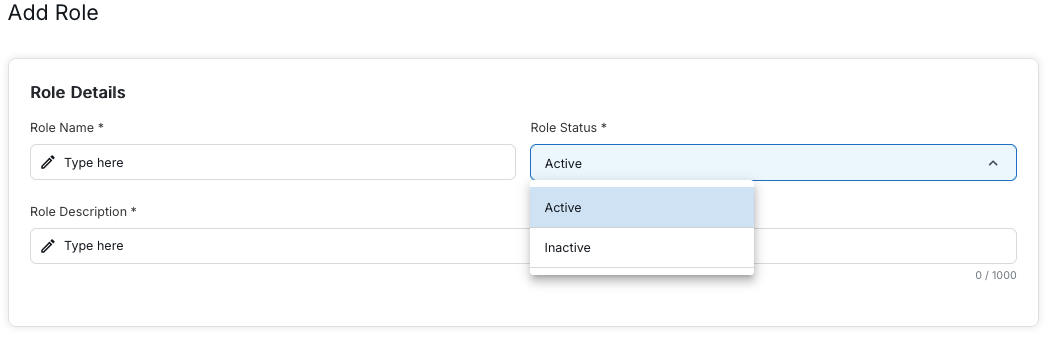
- The "Add Role" modal dialog will appear with a "Role Details" section
- Fill in the required information:
- Role name
- Role description
- Role status
- Click "Submit" to add the role to the system
- The new role will appear in the roles table
Add Role Form Fields
The Add Role modal contains the following fields in the "Role Details" section:
- Role Name*: Required field for the role's name. Enter a descriptive name that clearly identifies the role (e.g., "Full Admin Access", "Default User"). The input field has a pencil icon and placeholder text "Type here".
- Role Description*: Required field for describing what the role allows users to do. This field includes a character counter showing "0 / 1000" indicating you can enter up to 1000 characters. The input field has a pencil icon and placeholder text "Type here".
- Role Status*: Required dropdown field to set the initial status of the role. You can select:
- Active: The role will be active and can be assigned to users immediately
- Inactive: The role will be inactive and cannot be assigned to users until it's activated
Fields marked with an asterisk (*) are required and must be filled in before the role can be created. The Role Description field has a character limit of 1000 characters, and the counter at the bottom right shows your current character count.
Submitting the Form
At the bottom of the modal, you'll find action buttons:
- Cancel: Closes the modal without saving any changes
- Submit: Creates the new role with the provided information and adds it to the system
Click "Submit" to create the role, or "Cancel" to close the dialog without creating a role.
Configuring Role Permissions
After creating a role, you may need to configure its permissions to control what features and criteria users with this role can access. The Cohort Designer configuration interface allows you to enable or disable various functionalities.
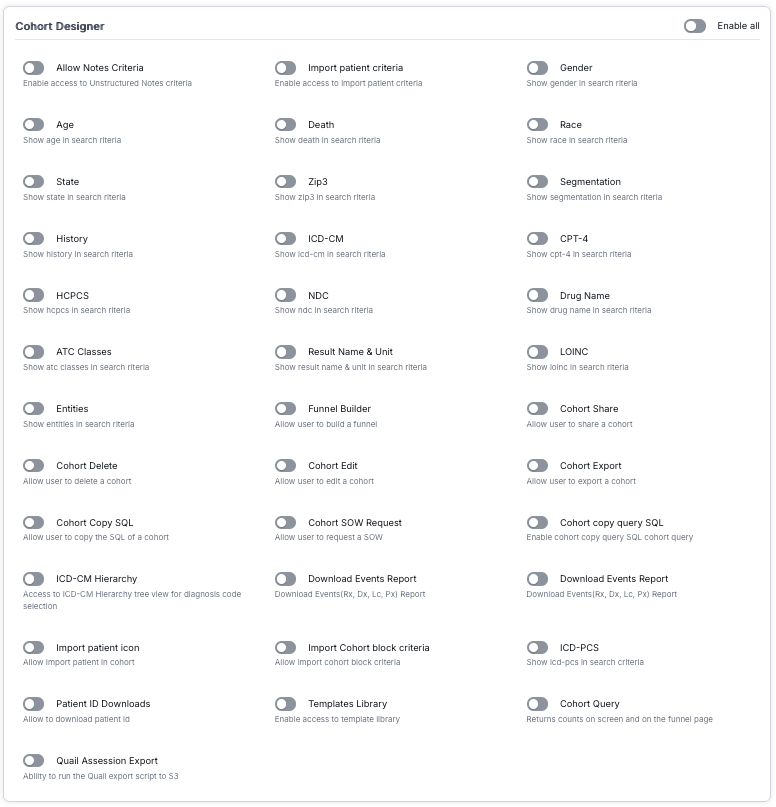
Enable All Toggle
At the top right of the Cohort Designer configuration page, there is an "Enable all" toggle switch. When enabled, this will turn on all available features and criteria for the role. When disabled (default), you can selectively enable individual features.
Feature Categories
The configuration interface is organized into three columns, each containing various features and criteria that can be enabled or disabled for the role:
Search Criteria Features
These toggles control which search criteria are available to users with this role:
- Allow Notes Criteria: Enable access to Unstructured Notes criteria
- Age: Show age in search criteria
- State: Show state in search criteria
- Gender: Show gender in search criteria
- Race: Show race in search criteria
- Death: Show death in search criteria
- Zip3: Show zip3 in search criteria
- History: Show history in search criteria
- Segmentation: Show segmentation in search criteria
- ICD-CM: Show ICD-CM in search criteria
- ICD-PCS: Show ICD-PCS in search criteria
- CPT-4: Show CPT-4 in search criteria
- HCPCS: Show HCPCS in search criteria
- NDC: Show NDC in search criteria
- Drug Name: Show drug name in search criteria
- ATC Classes: Show ATC classes in search criteria
- Result Name & Unit: Show result name & unit in search criteria
- LOINC: Show LOINC in search criteria
- Entities: Show entities in search criteria
Cohort Management Features
These toggles control what actions users can perform with cohorts:
- Cohort Delete: Allow user to delete a cohort
- Cohort Edit: Allow user to edit a cohort
- Cohort Share: Allow user to share a cohort
- Cohort Export: Allow user to export a cohort
- Cohort Copy SQL: Allow user to copy the SQL of a cohort
- Cohort copy query SQL: Enable cohort copy query SQL cohort query
- Cohort SOW Request: Allow user to request a SOW (Statement of Work)
- Cohort Query: Returns counts on screen and on the funnel page
Additional Features
- Funnel Builder: Allow user to build a funnel
- ICD-CM Hierarchy: Access to ICD-CM Hierarchy tree view for diagnosis code selection
- Import patient icon: Allow Import patient in cohort
- Import patient criteria: Enable access to Import patient criteria
- Import Cohort block criteria: Allow Import cohort block criteria
- Patient ID Downloads: Allow to download patient ID
- Download Events Report: Download Events (Rx, Dx, Lc, Px) Report
- Quail Assession Export: Ability to run the Quail export script to S3
- Templates Library: Enable access to template library
Using the Toggle Switches
Each feature has a toggle switch that can be turned on (enabled) or off (disabled):
- Enabled (On): The toggle switch appears blue/green with the circle on the right, indicating the feature is active for users with this role
- Disabled (Off): The toggle switch appears gray with the circle on the left, indicating the feature is not available for users with this role
Click on any toggle switch to enable or disable that specific feature. Use the "Enable all" toggle at the top to quickly enable all features, or configure them individually based on your organization's needs.
Notes Query Configuration
In addition to Cohort Designer permissions, you can also configure Notes Query permissions for each role. This controls what features users can access when working with notes queries.
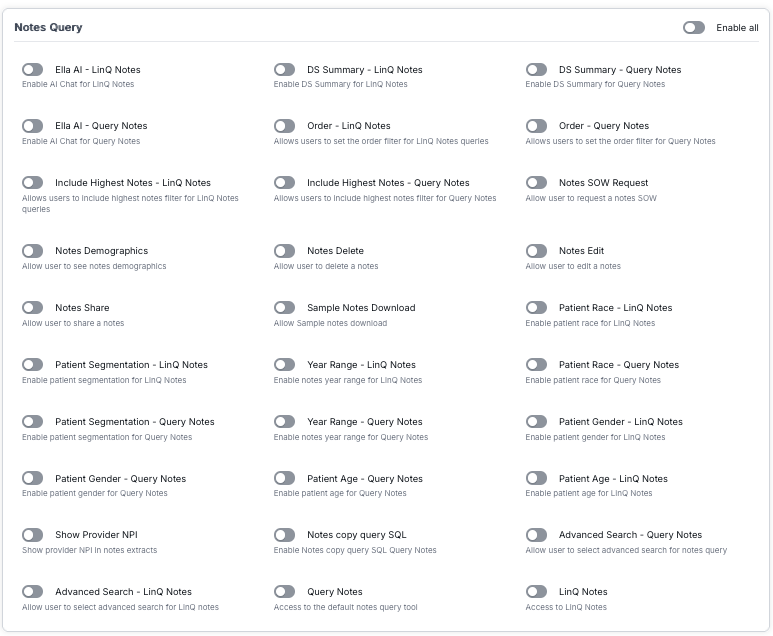
Enable All Toggle
At the top right of the Notes Query configuration page, there is an "Enable all" toggle switch. When enabled, this will turn on all available Notes Query features for the role. When disabled (default), you can selectively enable individual features.
Notes Query Features
The configuration interface is organized into three columns, containing various Notes Query features that can be enabled or disabled for the role:
AI and Advanced Features
- Ella AI - LinQ Notes: Enable AI Chat for LinQ Notes
- Ella AI - Query Notes: Enable AI Chat for Query Notes
- Advanced Search - LinQ Notes: Allow user to select advanced search for LinQ notes
- Advanced Search - Query Notes: Allow user to select advanced search for notes query
Notes Management Features
- Notes Share: Allow user to share a notes
- Notes Delete: Allow user to delete a notes
- Notes Edit: Allow user to edit a notes
- Notes SOW Request: Allow user to request a notes SOW (Statement of Work)
- Notes copy query SQL: Enable Notes copy query SQL Query Notes
- Sample Notes Download: Allow Sample notes download
LinQ Notes Features
- LinQ Notes: Access to LinQ Notes
- DS Summary - LinQ Notes: Enable DS Summary for LinQ Notes
- Order - LinQ Notes: Allows users to set the order filter for LinQ Notes queries
- Include Highest Notes - LinQ Notes: Allows users to include highest notes filter for LinQ Notes queries
- Year Range - LinQ Notes: Enable notes year range for LinQ Notes
- Patient Segmentation - LinQ Notes: Enable patient segmentation for LinQ Notes
- Patient Race - LinQ Notes: Enable patient race for LinQ Notes
- Patient Gender - LinQ Notes: Enable patient gender for LinQ Notes
- Patient Age - LinQ Notes: Enable patient age for LinQ Notes
Query Notes Features
- Query Notes: Access to the default notes query tool
- DS Summary - Query Notes: Enable DS Summary for Query Notes
- Order - Query Notes: Allows users to set the order filter for Query Notes
- Include Highest Notes - Query Notes: Allows users to include highest notes filter for Query Notes
- Year Range - Query Notes: Enable notes year range for Query Notes
- Patient Segmentation - Query Notes: Enable patient segmentation for Query Notes
- Patient Race - Query Notes: Enable patient race for Query Notes
- Patient Gender - Query Notes: Enable patient gender for Query Notes
- Patient Age - Query Notes: Enable patient age for Query Notes
Additional Notes Features
- Notes Demographics: Allow user to see notes demographics
- Show Provider NPI: Show provider NPI in notes extracts
Configuring Notes Query Permissions
Each feature has a toggle switch that can be turned on (enabled) or off (disabled):
- Enabled (On): The toggle switch appears blue/green with the circle on the right, indicating the feature is active for users with this role
- Disabled (Off): The toggle switch appears gray with the circle on the left, indicating the feature is not available for users with this role
Click on any toggle switch to enable or disable that specific Notes Query feature. Use the "Enable all" toggle at the top to quickly enable all Notes Query features, or configure them individually to grant users access only to the specific notes query capabilities they need.
Other Functions Configuration
The "Other Functions" configuration section allows you to control access to various administrative and system-wide features. This section manages permissions for user management, organization management, reports, and other system functions.
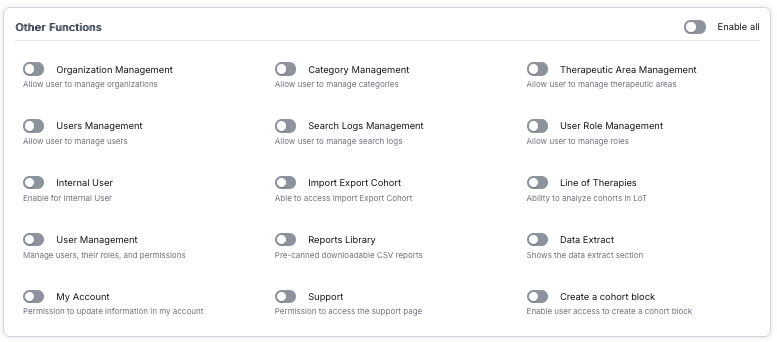
Enable All Toggle
At the top right of the Other Functions configuration panel, there is an "Enable all" toggle switch. When enabled, this will turn on all available other functions for the role. When disabled (default), you can selectively enable individual functions.
Other Functions List
The configuration interface is organized into three columns, containing various system functions that can be enabled or disabled for the role:
Management Functions
- Organization Management: Allow user to manage organizations
- Users Management: Allow user to manage users
- User Management: Manage users, their roles, and permissions
- User Role Management: Allow user to manage roles
- Category Management: Allow user to manage categories
- Therapeutic Area Management: Allow user to manage therapeutic areas
- Search Logs Management: Allow user to manage search logs
User and Account Functions
- Internal User: Enable for Internal User
- My Account: Permission to update information in my account
Data and Analysis Functions
- Import Export Cohort: Able to access Import Export Cohort
- Line of Therapies: Ability to analyze cohorts in LoT (Line of Therapies)
- Data Extract: Shows the data extract section
- Create a cohort block: Enable user access to create a cohort block
Reports and Support Functions
- Reports Library: Pre-canned downloadable CSV reports
- Support: Permission to access the support page
Configuring Other Functions Permissions
Each function has a toggle switch that can be turned on (enabled) or off (disabled):
- Enabled (On): The toggle switch appears blue/green with the circle on the right, indicating the function is active for users with this role
- Disabled (Off): The toggle switch appears gray with the circle on the left, indicating the function is not available for users with this role
Click on any toggle switch to enable or disable that specific function. Use the "Enable all" toggle at the top to quickly enable all other functions, or configure them individually to grant users access only to the specific administrative and system capabilities they need.
Important: Functions like "Users Management," "User Role Management," and "Organization Management" are typically restricted to administrators only, as they control critical system access and user permissions.
API Access Configuration
The "API Access" configuration section allows you to control which APIs users with this role can access. This is important for managing programmatic access to the system's data and functionality.
Enable All Toggle
At the top right of the API Access configuration panel, there is an "Enable all" toggle switch. When enabled, this will grant access to all available APIs for the role. When disabled (default), you can selectively enable individual API access.
API Types
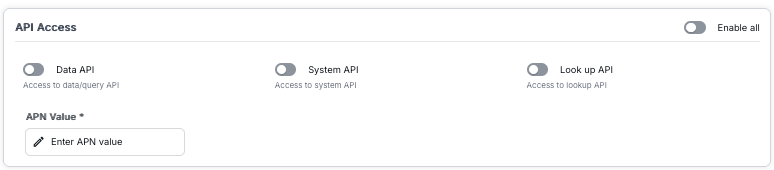
The configuration interface displays three types of API access that can be enabled or disabled for the role:
- Data API: Access to data/query API - Allows users to programmatically query and retrieve data from the system
- System API: Access to system API - Allows users to interact with system-level functions and configurations via API
- Look up API: Access to lookup API - Allows users to perform lookup operations and retrieve reference data via API
APN Value Configuration
Below the API toggles, there is a required field for "APN Value":
- APN Value*: This is a required field (indicated by the asterisk) where you must enter the APN (Application Provider Network) value. The input field has a pencil icon and placeholder text "Enter APN value". This value is used to identify and authenticate API access for the role.
The APN value is essential for API authentication and must be configured correctly for API access to function properly. Ensure you enter a valid APN value that corresponds to your organization's API configuration.
Configuring API Access Permissions
Each API type has a toggle switch that can be turned on (enabled) or off (disabled):
- Enabled (On): The toggle switch appears blue/green with the circle on the right, indicating the API is accessible for users with this role
- Disabled (Off): The toggle switch appears gray with the circle on the left, indicating the API is not accessible for users with this role
Click on any toggle switch to enable or disable that specific API access. Use the "Enable all" toggle at the top to quickly enable all API access, or configure them individually based on your organization's API access requirements.
Security Note: API access should be granted carefully, as it provides programmatic access to system data and functions. Only enable API access for roles that require it, and ensure the APN value is kept secure.
Data Sources Access Configuration
The "Data Sources Access" configuration section allows you to control which data sources users with this role can access. This is important for managing access to different types of healthcare data, such as labs, EMR (Electronic Medical Records), and claims data.
Enable All Toggle
At the top right of the Data Sources Access configuration panel, there is an "Enable all" toggle switch. When enabled, this will grant access to all available data sources for the role. When disabled (default), you can selectively enable individual data sources.
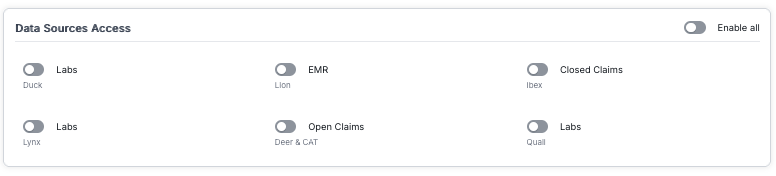
Available Data Sources
The configuration interface displays various data sources organized in a grid layout. Each data source has a toggle switch and is identified by its type and a secondary identifier (category or provider name):
Data Source Types
- Labs: Laboratory test results and data
- Duck - Laboratory data source
- Lynx - Laboratory data source
- Quall - Laboratory data source
- EMR: Electronic Medical Records data
- Lion - EMR data source
- Closed Claims: Closed insurance claims data
- Ibex - Closed claims data source
- Open Claims: Open insurance claims data
- Deer & CAT - Open claims data source
Understanding Data Source Identifiers
Each data source is labeled with:
- Primary Label: The type of data source (e.g., "Labs", "EMR", "Closed Claims", "Open Claims")
- Secondary Label: A specific identifier or category name (e.g., "Duck", "Lion", "Ibex", "Lynx", "Quall", "Deer & CAT") that distinguishes different instances or providers of the same data type
This allows you to grant access to specific data source providers or categories within the same data type. For example, you can enable access to one Labs provider (e.g., "Duck") while disabling access to another Labs provider (e.g., "Lynx").
Configuring Data Sources Access Permissions
Each data source has a toggle switch that can be turned on (enabled) or off (disabled):
- Enabled (On): The toggle switch appears blue/green with the circle on the right, indicating the data source is accessible for users with this role
- Disabled (Off): The toggle switch appears gray with the circle on the left, indicating the data source is not accessible for users with this role
Click on any toggle switch to enable or disable that specific data source access. Use the "Enable all" toggle at the top to quickly enable all data sources, or configure them individually based on your organization's data access requirements.
Important: Data source access controls what data users can query and analyze. Only enable access to data sources that users with this role need for their work. This helps maintain data security and ensures users only see data they are authorized to access.
Notes Cohort Analytics Configuration
The "Notes Cohort Analytics" configuration section allows you to control which features users with this role can access when working with notes in cohort analytics. This includes features for downloading data, viewing patient details, and accessing AI capabilities.
Enable All Toggle
At the top right of the Notes Cohort Analytics configuration panel, there is an "Enable all" toggle switch. When enabled, this will grant access to all available Notes Cohort Analytics features for the role. When disabled (default), you can selectively enable individual features.
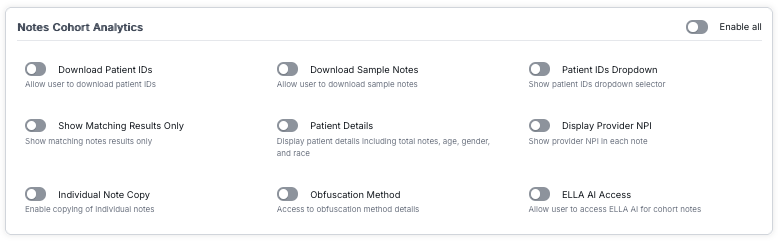
Notes Cohort Analytics Features
The configuration interface displays nine features organized in a 3x3 grid layout. Each feature can be enabled or disabled for the role:
Download and Export Features
- Download Patient IDs: Allow user to download patient IDs
- Download Sample Notes: Allow user to download sample notes
Display and Viewing Features
- Show Matching Results Only: Show matching notes results only
- Patient Details: Display patient details including total notes, age, gender, and race
- Patient IDs Dropdown: Show patient IDs dropdown selector
- Display Provider NPI: Show provider NPI in each note
Notes Management Features
- Individual Note Copy: Enable copying of individual notes
- Obfuscation Method: Access to obfuscation method details
AI Features
- ELLA AI Access: Allow user to access ELLA AI for cohort notes
Configuring Notes Cohort Analytics Permissions
Each feature has a toggle switch that can be turned on (enabled) or off (disabled):
- Enabled (On): The toggle switch appears blue/green with the circle on the right, indicating the feature is active for users with this role
- Disabled (Off): The toggle switch appears gray with the circle on the left, indicating the feature is not available for users with this role
Click on any toggle switch to enable or disable that specific feature. Use the "Enable all" toggle at the top to quickly enable all Notes Cohort Analytics features, or configure them individually based on your organization's requirements.
Feature Overview: These features control how users interact with notes data in cohort analytics. Enabling features like "Download Patient IDs" or "Download Sample Notes" allows users to export data, while features like "Patient Details" and "Display Provider NPI" control what information is visible in the interface.
Cohort Analytics Configuration
The "Cohort Analytics" configuration section allows you to control which analytics tabs and reports users with this role can access. This determines what analytical views and reports are available when users analyze cohorts.
Enable All Toggle
At the top right of the Cohort Analytics configuration panel, there is an "Enable all" toggle switch. When enabled, this will grant access to all available analytics tabs and reports for the role. When disabled (default), you can selectively enable individual analytics features.
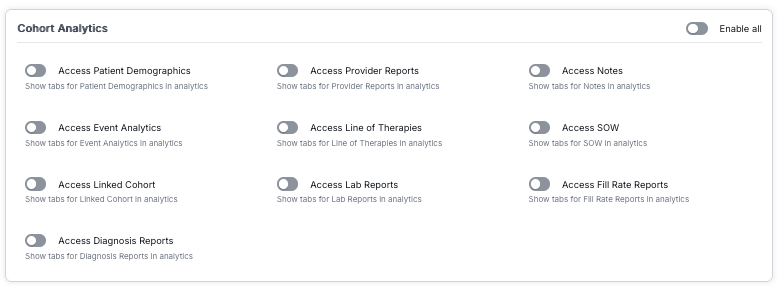
Analytics Tabs and Reports
The configuration interface displays ten analytics features organized in three columns. Each feature controls access to a specific analytics tab or report:
Demographics and Patient Analytics
- Access Patient Demographics: Show tabs for Patient Demographics in analytics
- Access Linked Cohort: Show tabs for Linked Cohort in analytics
Event and Diagnosis Analytics
- Access Event Analytics: Show tabs for Event Analytics in analytics
- Access Diagnosis Reports: Show tabs for Diagnosis Reports in analytics
Provider and Lab Analytics
- Access Provider Reports: Show tabs for Provider Reports in analytics
- Access Lab Reports: Show tabs for Lab Reports in analytics
Treatment and Therapy Analytics
- Access Line of Therapies: Show tabs for Line of Therapies in analytics
Notes and Documentation Analytics
- Access Notes: Show tabs for Notes in analytics
Business and Operational Analytics
- Access SOW: Show tabs for SOW (Statement of Work) in analytics
- Access Fill Rate Reports: Show tabs for Fill Rate Reports in analytics
Configuring Cohort Analytics Permissions
Each analytics feature has a toggle switch that can be turned on (enabled) or off (disabled):
- Enabled (On): The toggle switch appears blue/green with the circle on the right, indicating the analytics tab is visible and accessible for users with this role
- Disabled (Off): The toggle switch appears gray with the circle on the left, indicating the analytics tab is hidden and not accessible for users with this role
Click on any toggle switch to enable or disable that specific analytics tab. Use the "Enable all" toggle at the top to quickly enable all analytics features, or configure them individually based on your organization's analytics requirements.
Feature Overview: These features control which analytics tabs appear in the Cohort Analytics interface. When enabled, users will see the corresponding tabs and can access those specific reports and analyses. When disabled, those tabs will be hidden from the user interface, providing a customized analytics experience based on role permissions.
Roles Data Table

The main content area displays a comprehensive table listing all roles in the system. The table includes the following columns:
Table Columns
- Role Name: The name of the role (e.g., "Citeline users", "Syneos_role", "test admin 1", "Developer", "disable test", "test deepak")
- Description: A brief description of what the role allows users to do (e.g., "citeline users access new", "User roles for syneos users", "Developer Role")
- Users Assigned: The number of users currently assigned to this role (e.g., "0", "2"). This shows how many users are using each role in the system
- Status: The current status of the role, displayed as a pill-shaped button:
- Active: Shown in light blue with white text "Active" - the role is active and can be assigned to users
- Inactive: Shown in red with white text "Inactive" - the role is inactive and cannot be assigned to new users
- Actions: Two action buttons for each role:
- Edit Icon (Pencil): Click to edit the role's details, permissions, and configuration
- Delete Icon (Trash Can): Click to delete the role from the system (with confirmation)
Understanding Role Status
The Status column indicates whether a role is active or inactive:
- Active: The role is active and can be assigned to users. This is displayed as a light blue pill-shaped button with white text "Active".
- Inactive: The role is inactive and cannot be assigned to new users. This is displayed as a red pill-shaped button with white text "Inactive".
The status is displayed as a colored button in the table, making it easy to identify the role state at a glance. The color coding (blue for Active, red for Inactive) provides immediate visual feedback about each role's status.
Role Actions
Each role row in the table includes action buttons in the rightmost column:
Editing a Role
To edit an existing role's information:
- Locate the role in the table
- Click the pencil icon (edit icon) in the Actions column for that role
- An edit dialog or form will appear with the role's current information
- Modify the fields you want to update:
- Role name
- Description
- Permissions
- Status
- Click "Save" to apply the changes
Deleting a Role
To delete a role from the system:
- Locate the role in the table
- Click the trash can icon (delete icon) in the Actions column for that role
- A confirmation dialog will appear to prevent accidental deletions
- Confirm the deletion by clicking "Delete" or "Confirm" in the dialog
- The role will be removed from the system and will no longer appear in the table
Understanding Roles
Roles are predefined sets of permissions that determine what users can do within the system. Common roles include:
- Full Admin Access: Complete system access with the ability to manage users, roles, and all system settings
- Default User: Standard user access with the ability to create and manage cohorts, view data, and perform standard operations, but without access to admin areas
- Custom Roles: Administrators can create custom roles with specific permission sets tailored to organizational needs
Users Assigned Count
The "Users Assigned" column shows how many users are currently assigned to each role. This information helps administrators:
- Understand role usage across the system
- Identify which roles are most commonly used
- Make informed decisions when modifying or deleting roles
- Plan role assignments and access control strategies
Pagination Controls
When there are many roles in the system, the table uses pagination to display roles in manageable pages. The pagination controls are located at the bottom of the table.
Pagination Features
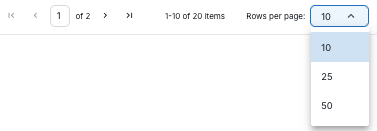
- Page Indicator: Shows the current page number and total pages (e.g., "1 of 2"). The current page number is highlighted in a box, making it easy to see your position in the list
- Item Count: Displays the range of items shown and total items (e.g., "1-10 of 20 Items"). This shows how many roles are displayed on the current page out of the total number of roles
- Rows Per Page: A dropdown menu allowing you to select how many roles to display per page. Available options include:
- 10 (default)
- 25
- 50
- Navigation Arrows: Four navigation buttons:
- First page (double left arrow): Jump to the first page
- Previous page (single left arrow): Go back one page
- Next page (single right arrow): Advance one page
- Last page (double right arrow): Jump to the last page
Using Pagination
To navigate through multiple pages of roles:
- Use the arrow buttons to move between pages
- Click the first/last page buttons to jump to the beginning or end of the list
- Use the "Rows per page" dropdown to change how many roles are displayed per page (10, 25, 50, 100, etc.)
- The page indicator shows your current position in the list
Key Features Summary
- Comprehensive Role List: View all roles in a sortable, searchable table format
- Quick Search: Instantly find roles by typing in the search bar
- Role Management: Add, edit, and delete roles with ease
- User Assignment Tracking: See how many users are assigned to each role
- Status Management: View and manage role status (Active/Inactive)
- Permission Control: Define and modify what actions each role can perform
- Efficient Navigation: Use pagination to browse through large role lists