Organizations
The Organizations interface allows administrators to manage organizational structures, configure organization settings, and control access to organizational resources within the LinQ Explorer system.
Accessing the Organizations Interface
To access the Organizations management interface:
- Navigate to App Management from the main navigation
- Click on Organizations from the App Management menu
- The Organizations interface will display all registered organizations in the system
Organizations Interface Overview
The Organizations interface provides a comprehensive view of all organizations in the system. Organizations help structure users, manage access control, and organize data and resources within LinQ Explorer.

Header Section
The header section of the Organizations interface contains three main elements:
- Page Title: "Organizations" displayed prominently at the top-left of the page
- Search Bar: Located in the top-right area, allows you to search for organizations by typing keywords in the "Search organizations..." field
- Add New Organization Button: A dark blue button with a building icon and "Add New Organization" text, positioned next to the search bar
Searching for Organizations

To search for specific organizations:
- Click in the "Search organizations..." input field in the header
- Type any part of the organization name or other identifying information
- The table will automatically filter to show matching organizations as you type
- Clear the search field to view all organizations again
The search functionality filters the organizations table in real-time as you type, making it easy to find specific organizations in large organization lists. For example, typing "catal" in the search field will display only organizations whose name contains "catal" (such as "Catalyst"). The filtered results are displayed immediately, showing the matching organization with all its details including users assigned, dates, and status.
Adding a New Organization
To add a new organization to the system:
- Click the "Add New Organization" button in the header
- The "Add New Organization" modal dialog will appear
- Fill in the required information:
- Organization name
- Contract end date
- Status
- Click "Add Organization" to create the organization
- The new organization will appear in the organizations table
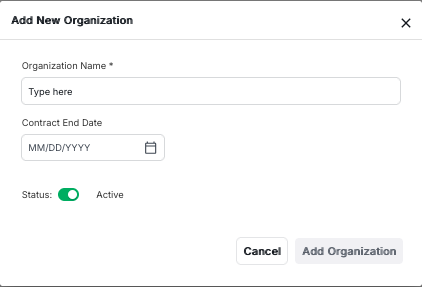
Add Organization Form Fields
The Add New Organization modal contains the following fields:
- Organization Name*: Required field for the organization's name. Enter a descriptive name that clearly identifies the organization. The input field has placeholder text "Type here".
- Contract End Date: Optional field for the organization's contract expiration date. The input field has placeholder text "MM/DD/YYYY" and includes a calendar icon on the right, allowing you to use a date picker to select the date. You can either type the date manually or click the calendar icon to select a date from a calendar widget.
- Status: A toggle switch to set the initial status of the organization:
- Active (On): When the toggle is on (green), the organization will be active and can be assigned to users immediately
- Inactive (Off): When the toggle is off (gray), the organization will be inactive and cannot be used for new user assignments
Fields marked with an asterisk (*) are required and must be filled in before the organization can be created. The "Add Organization" button will remain disabled (gray) until all required fields are completed.
Using the Date Picker
To set the Contract End Date:
- Click in the "Contract End Date" input field, or
- Click the calendar icon next to the input field
- A calendar widget will appear allowing you to select a date
- Navigate through months and years to find the desired date
- Click on the date to select it
- The date will be automatically formatted and entered into the field
Submitting the Form
At the bottom of the modal, you'll find two action buttons:
- Cancel: Closes the modal without saving any changes. This button has a white background with a dark gray border.
- Add Organization: Creates the new organization with the provided information and adds it to the system. This button will be disabled (light gray) until all required fields are filled in, then it becomes active and clickable.
Click "Add Organization" to create the organization once all required fields are completed, or "Cancel" to close the dialog without creating an organization.
Organizations Data Table

The main content area displays a comprehensive table listing all organizations in the system. The table includes the following columns:
Table Columns
- Organization Name: The name of the organization (e.g., "Catalyst", "A_Org_20251222_120452", "wqrwqrwqr_v1", "date_updateasas", "test disble", "Updated Acme Corporation", "Pharming", "RWD Data Explorer")
- Users Assigned: The number of users currently assigned to this organization (e.g., "0", "285", "3", "1"). This shows how many users are using each organization in the system
- Date Created: The date when the organization was first created, displayed in "DD Month, YYYY" format (e.g., "22 January, 2026", "22 December, 2025", "06 November, 2025", "27 October, 2025", "01 July, 2025")
- Contract End Date: The date when the organization's contract expires, displayed in "DD Month, YYYY" format (e.g., "31 December, 1969", "05 February, 2026"). This date helps track contract expiration and manage organizational access
- Status: The current status of the organization, displayed as a pill-shaped button:
- Active: Shown in blue with white text "Active" - the organization is active and can be assigned to users
- Inactive: Shown in red with white text "Inactive" - the organization is inactive and cannot be used for new user assignments
- Actions: Two action buttons for each organization:
- Edit Icon (Pencil): Click to edit the organization's details, contract end date, and status
- Delete Icon (Trash Can): Click to delete the organization from the system (with confirmation)
Understanding Organization Status
The Status column indicates whether an organization is active or inactive:
- Active: The organization is active and users can be assigned to it. This is displayed as a blue pill-shaped button with white text "Active".
- Inactive: The organization is inactive and cannot be used for new user assignments. This is displayed as a red pill-shaped button with white text "Inactive".
The status is displayed as a colored button in the table, making it easy to identify the organization state at a glance. The color coding (blue for Active, red for Inactive) provides immediate visual feedback about each organization's status.
Users Assigned Count
The "Users Assigned" column shows how many users are currently assigned to each organization. This information helps administrators:
- Understand organization usage across the system
- Identify which organizations have the most users
- Make informed decisions when modifying or deleting organizations
- Plan organizational structure and user assignments
Contract End Date
The "Contract End Date" column displays when each organization's contract expires. This is important for:
- Tracking contract expiration dates
- Planning contract renewals
- Managing access based on contract status
- Ensuring organizations remain active within their contract period
Organization Actions
Each organization row in the table includes action buttons in the rightmost column:
Editing an Organization
To edit an existing organization's information:
- Locate the organization in the table
- Click the pencil icon (edit icon) in the Actions column for that organization
- An edit dialog or form will appear with the organization's current information
- Modify the fields you want to update:
- Organization name
- Contract end date
- Status
- Other organization settings
- Click "Save" to apply the changes
Deleting an Organization
To delete an organization from the system:
- Locate the organization in the table
- Click the trash can icon (delete icon) in the Actions column for that organization
- A confirmation dialog will appear to prevent accidental deletions
- Confirm the deletion by clicking "Delete" or "Confirm" in the dialog
- The organization will be removed from the system and will no longer appear in the table
Pagination Controls
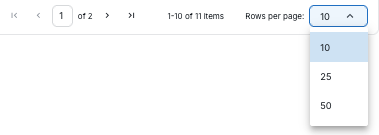
When there are many organizations in the system, the table uses pagination to display organizations in manageable pages. The pagination controls are located at the bottom of the table.
Pagination Features
- Page Indicator: Shows the current page number and total pages (e.g., "1 of 2"). The current page number is highlighted in a box
- Item Count: Displays the range of items shown and total items (e.g., "1-10 of 11 Items"). This shows how many organizations are displayed on the current page out of the total number of organizations
- Rows Per Page: A dropdown menu allowing you to select how many organizations to display per page. Available options include 10, 25, 50, etc. The currently selected value is highlighted in the dropdown menu
- Navigation Arrows: Four navigation buttons:
- First page (double left arrow): Jump to the first page
- Previous page (single left arrow): Go back one page
- Next page (single right arrow): Advance one page
- Last page (double right arrow): Jump to the last page
Using Pagination
To navigate through multiple pages of organizations:
- Use the arrow buttons to move between pages
- Click the first/last page buttons to jump to the beginning or end of the list
- Use the "Rows per page" dropdown to change how many organizations are displayed per page (10, 25, 50, etc.)
- The page indicator shows your current position in the list
Understanding Organizations
Organizations are used to group users and manage access to system resources. They help:
- Organize users into logical groups (companies, departments, teams)
- Control access to data and features based on organizational membership
- Manage organizational-level settings and configurations
- Track usage and activity by organization
- Enforce data isolation and security boundaries
Key Features Summary
- Comprehensive Organization List: View all organizations in a sortable, searchable table format
- Quick Search: Instantly find organizations by typing in the search bar
- Organization Management: Add, edit, and delete organizations with ease
- User Assignment Tracking: See how many users are assigned to each organization
- Contract Management: Track contract end dates for each organization
- Status Management: View and manage organization status (Active/Inactive)
- Efficient Navigation: Use pagination to browse through large organization lists